![]()
|
|
|
|
PART 1. AL-IV: How to start programming |
| A reference to download compilers and base
code samples: https://sourceforge.net/projects/al-iv/ |
||
| Last date changed: April, 2021 | ||
Select a compiler and a target platform |
||
|
||
|
|
||
Configure parameters to pass to a compiler |
||
|
||
|
||
|
||
Editing source code |
||
Follow these rules and you will get much more readable, structured and understandable code which can be easy corrected and supported later.
|
||
Compiler launching, errors analyzing |
||
|
||
| P.S. In the APPENDIX (below), configuring of a certain sample is examined more detailed. | ||
If libraries have not enough necessary functions ... |
||
|
||
Debugging |
||
|
PART 2. AL-IV: Creating GUI applications |
| Preamble. Programming an application with a visual graphics interface in the AL-IV is constructed the way allowing to write a single universal code for all the target platforms and depending on a selected compiler and a selected library of classes, to get in result an application for a certain "platform". Independently on a platform, a resulting application will consist of the same set of almost identical (by capabilities) visual and un-visual control items which always work the same way.
Some differences are possible though. In some environments a symbol '/' is used to divide directories, in others the symbol '\' is used. In one case a user makes a right click to pop-up a menu, in other cases he may be click twice or does something else. An exterior of a form can differ and even controls layout on a form can depend on a target device.
I.e. we develop an application in a convenient for a developer environment and then we specify in which target platform we want to get it working. And it is compiled for that platform though we did not change the source at all to adopt it to another platform.
Unfortunately there are also some drawbacks:
|
2.1. Tree of visual and nonvisual components to develop applications |
|
|
| All the standard visual items are
direct descendants of a class |
|||||||||||||||||||||||||||||||||||||||||||||||
|
| Visual control items particularities are often results of a features of its correspondent mirrors components features and restrictions. If such prototype control component has a serious disadvantage in comparison to other such mirrors on other platforms, we have either to try to overcome this one or to lower our control functionality. And this last is anyway better way then to allow sufficiently different behavior of a control on different target palatforms.
In the table above the right three columns corresponding to target platforms contain comments on implementation on certain platforms.
E.g., for |
| Non-visual control items ( |
2.2. Form organization. Columns. |
| Form is designed as two leveled [but see also an addition in the next paragraph]: form contains columns, which contain controls (buttons, labels, text fields, combo boxes etc.) Actually it is possible that amount of nested levels can be more then two: form can contain a scrollable pane containing columns, as well as columns can contain scrollable panes, which has controls placed in those. (In case of a mobile application forms are represented by panels located on a form representing the application). But these additional nesting levels are invisible for custom code, so for a programmer, this model stays two-leveled. |
| Moreover, columns also have no its own class and these are controlled via form methods. It is not necessary to control too many parameters of columns though. Its layout is set once on creation. It is only possible to hide column, add or remove items on it, and change its size (but this last can be ignored in some target environments). It is important to understand that an some target systems the exterior of a form can be different from the layout initially designed. E.g. in case of small smartphone screen, not all the columns can be visible together, and switching between them can be implemented using gestures, additional buttons or other ways. |
|
|
| If in a constructor of a form start
creating controls without creating a column, the first column is
therefore created as unnamed, If there are several columns aligned 'CLIENT' then only one will be showing at a time: the client column for which in the form event column_hidden, the result FALSE was returned.
|
| Additionally, it is allowed to create "nested" perpendicular columns with alignment 'LEFT'/'TOP', 'RIGHT', 'BOTTOM'. When creating such column, the alias of the "parent" column is specified, which aligning should not be "parallel" to the "nested" column aligning (e.g. if the "nested" column aligned 'LEFT' or 'RIGHT', the parent column should not be aligned 'LEFT' or 'RIGHT' too). Terms "nested" and "parent" are quoted still actually another nesting level is not created: the "parent" column is just used as an anchor, or basis, and its rectangle is cutting from the correspondent side to allocate the "nested" column during allocation process. Note that on some platforms nesting columns is not supported and columns are placed directly on the form with the aligning specified (Android). |
| For a case of automatic controls placing:
For columns aligned to |
|
A "label width" parameter (passed on a column creation via a
Only one visual item in a column is allowed to be
resizable together with a column resizing (by height). And not all
visual control classes are allowing vertical sizing (these are |
| For columns aligned to An example of a column aligned top/bottom (schema): |
|
|
|
For such horizontal "columns" it is possible to specify the property controlling controls placement: with the method Set_controls_layout({controls_layout}) or in the Form Designer. Possible variants: 'CONTROLS_LEFT' - all the visual items are placed from the left to the right. If the last control is of class {Edit}, {Compo}, {Paintbox} (or its inheritance) and has the flag set "Expanded right/bottom", then it occupies the rest of the column; 'CONTROLS_RIGHT' - all the items are located at the right side of the column; 'CONTROLS_CENTER' - items are allocated on the same distance from each other and from the column left and right sides (if there is enough space, otherwise similar to 'CONTROLS_LEFT'); 'CONTROLS_JUSTIFY' - like above but the left and the right items are pined to the column sides without a gap; 'CONTROLS_LEFT_LAST_RIGHT' - the same as 'CONTROLS_LEFT' but the last item is located at the right side (if there is space in the column); 'CONTROLS_TOP_To_BOTTOM' - for a horizontal column, vertical controls layout is defined; in nost cases it is necessary to set up the column height manually to make visible all its controls; 'CONTROLS_VERTICAL_2|_COLUMNS' - works both for horizontal and vertical columns dividing them only the left and the right columns; first a half of controls are placed in the left side, from the top to the bottom, then the rest of them at the right side, also from top to bottom; |
|
It is possible also to refuse from automatic controls placement calling Set_column_auto_arrange(FALSE), and place them manually by your code. E.g. in the form event resize. (But on some platforms such call can be ignored, and this should be taken into account). |
2.3. Events handling |
| There are not pointers to functions
in the AL-IV. The are no delegates like in C# or listeners like in Java
- these are too bulky way to handle events. The single way to handle
events from visual controls in the AL-IV is in overriding correspondent
methods of a form, e.g. For cases of descending controls, some events are also called for controls. E.g. to handle mouse events. |
| Like all the methods starting from a lowercase letter, these methods are protected. These also are marked as CALLBACK, i.e. these are not designed to call it by your code. Though such restriction is not inherited in a derived class, protecting only the method itself from incorrect usage. |
| If similar events should be handled
from several controls on a form, it is necessary to analyze a parameter
|
| It is recommended complex enough handling of events take out from such CASE to separate methods, leaving only sufficiently short handlers there containing not more than several lines of code. |
| In case when it is necessary to combine into one place handling the same event from different sources (buttons, menu, keyboard etc.), it is better to use for that menu handler, calling it from all the alternative methods. (To avoid complains from the compiler about incorrect using of a CALLBACK method menu, move your code to a separate method, naming it e.g. "operation", and calling it from event handlers like menu, click and others, passing necessary parameter to identify an operation called). |
| It is possible to simplify
developing forms/dialogs if to use classes |
2.5. Pop-up menu |
| In the AL-IV it is suggested to use only pop up menu. To simulate a main menu it is possible to use a column with buttons aligned 'TOP' in which pressing a button leads to a correspondent popup up menu show. |
||
| A menu is created on base of
strings separated by end line symbols ( |
||
| String lines used to specify menu items consist of a menu item and menu text colon separated. If there is no a colon symbol (':') there, then the entire text is used as an alias of the menu item in such case (it is not recommended to do so, since you later can provide a string localization, including a menu items localization). It is possible to write additional attributes "disabled" and/or "checked" comma separated between the menu item alias and the colon. E.g. calling a traditional file menu for a "File" button (in a "main
menu" made from buttons): |
||
|
||
| A line which is specifying a menu
is passed to a function |
||
| In an event handler it is better to
analyze (using the |
||
| To make it possible to create / edit menu with the visual Menu Editor (which is a part of the Form Designer), it is suggested to use functions from the class {Menu|_create}. When using them, the menu above will be looking like following: |
||
|
| An additional feature from using the menu designer: such menus are drawn below the form scheme, allowing by mouse double click to go to the menu item handler in the code (in the IDE). |
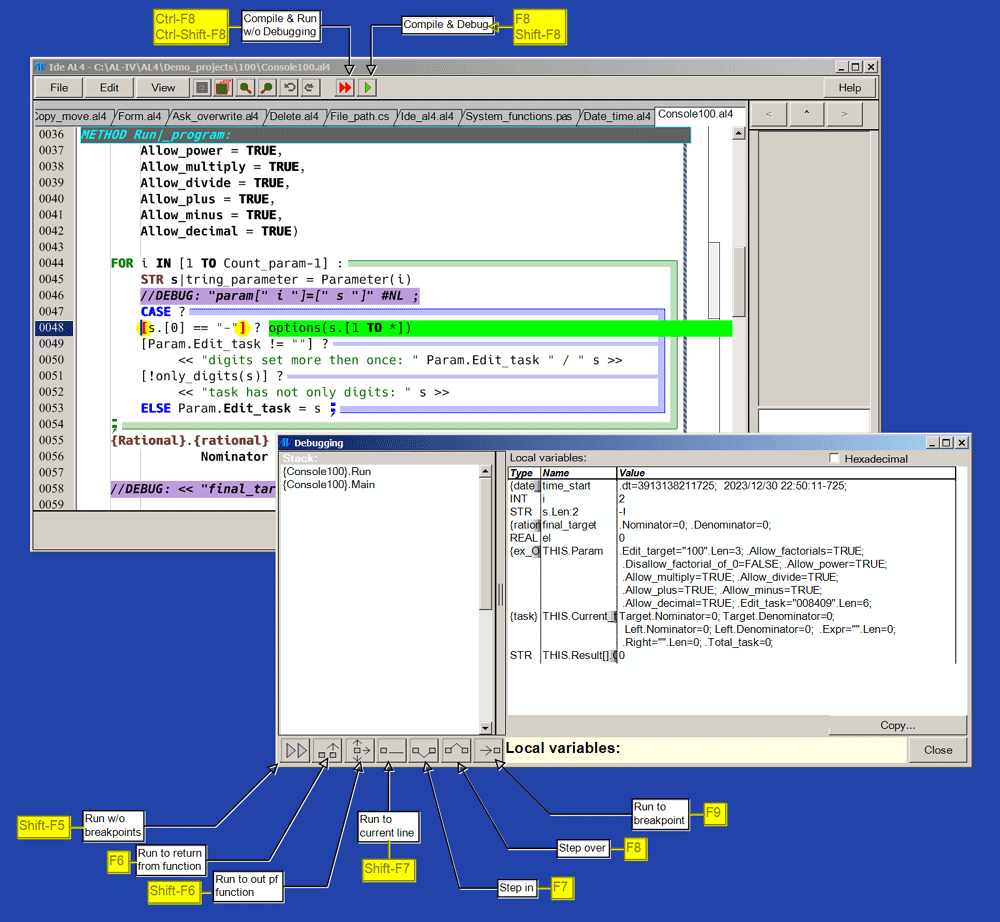
PART 3. Development environment: source editor IDE AL4 |
Debugger with the embedded debugger |
|
APPENDIX 1. AL-IV: Command files magician running a compiler |
APPENDIX 2. AL-IV: Gradual switching to AL-IV in an existing project |
|
(not finished) |
Formulation a task to migrate to AL-IV |
|
Suppose we have an application created with Delphi + VCL or Delphi + KOL, with a lot of forms and code attached to them. And for some reasons we desire to move all such project to AL-IV (e.g. we want to provide running it on Linux or supporting of Delphi become stopped on modern computers or others). But to convert to AL-IV all 10 (or more) forms together with its code is not possible. Let us do it by another way. |
Solution: change th AL-IV syntax to the Pascal-like |
|
Starting from the version 1.3.0, the AL-IV supports the Pascal
syntax. This means that the AL-IV compiler accepts Pascal classes though
with some restrictions in syntax and semantics. The first we should
place at the start of the Pascal unit the following 5 lines: |
|
After that the usual Pascal code should be located starting from the unit directive with the unit name as usual for Pascal code, and ending with the directive end with the dot. And it is possible to just add the comment above to the ordinal Pascal (Delphi) unit and try to pass it to the AL-IV compiler as an input. |
Unsupported statements |
|
But in the most cases the first attempt will not be successful, since the AL-IV compiler understands not all the Pascal syntax. E.g., following things are not supported: |
|
- the do ... while statement; - the with ... do block; - arrays of arrays; - redefining data types on base of already defined data types - global variables; - constructor parameters (these are just ignored with firing warnings); - several classes (with methods) in a single unit [since the AL-IV unit is always a class already, and all other classes must be just STRUCTUREs]; - optional parameters and parameters with default values; - arrays constructed enclosing into square brackets a list of any expressions; - constant arrays in the AL-IV always should be indexed from the 0 unlike the Pascal where any integer number can be used to start from (or even a enumeration type can be used or Boolean to index items); - the are no properties with several indexes; |
Strong AL-IV rules in the Pascal code |
|
Also, some strict rules of the AL-IV continue working (though some of them made ease). E.g.: - a line of code (not accounting comments) should not exceed 80 characters length; - a sequent code block can not contain more then 7 simple statements
and 7 block statements, in other case the block should be separated with
the operator comment statement (in case of the Pascal syntax it is
written in form - there are no var parameters in the AL-IV and all other parameters should be used as read only in functions (so the code which do not satisfy this requirement must be rewritten); - names of fields, functions, constants should not be less then 8
characters length, or these should be extended in form (e.g.): |
Ease AL-IV rules in the Pascal code |
|
For the syntax like the Pascal following ease rules are introduced allowing to use the Pascal with a minimum code conversions: - case insensitivity for names of functions, variables, data types etc.; - there is not a restriction on a nesting level for statements (if/case, for/while); - it is allowed to not specify Clone/Dismiss while copying structures (records) - always cloning is used in such cases; - it is allowed to assign values to fields and "methods" having a setter defined (very similar to Delphi properties); |
Manual Pascal to AL-IV code conversion: conditional compiling |
|
Sometimes it is necessary to write two versions of code: for usual Delphi or Free Pascal and for AL-IV. And, in case of the AL-IV, it can be desired to write code directly using AL-IV language, not the Pascal.
For case of the AL-IV, the construction is used |
|
For the Pascal special code (or if the Pascal not needed at
all): |
|
Notes:
|
Manual Pascal to AL-IV code conversion: form transformation |
|
|
Programming with the Delphi in most is perpendicular to the AL-IV (and not only in the Delphi), and in case of the visual programming the situation looks even deeper: there are no above the very bacsic set of controls, it is not possible to lay these on the form as desirable, handling events is very different, etc. But all (or almost all) can be solved. |
|
|
First: you will need not panels: AL-IV columns are not just replacements for them. So, it is better to hide these from the AL-IV compiler using directives (*$ifdef al4*) moving its declarations to the (*$else*) part. If your form has not yet a constructo, create it. In its body, int the directive (*$ifdef al4code*) write creating columns and controls using AL-IV syntax directly. Certainly for all the control types used on a form it is necessary to find a nearest replacement. And if there are no such replacements then it is necesseray to re-write Delphi code to use another types of control having such analogues in the AL-IV. E.g. in the project below (Glazomer - Eye-measure), 5 components of type TShape was used on the panel to click on these selecting correct answer. This part of code was first re-written to use single TPaintbox, and a list of TShape controls was replaced with the array of 5 rectangles. |
|
|
The Delphi form events usually are written for each control as a sender and for each kind of an event, whereas in the AL-IV only one function for each event kind is used in the form code (and certainly in this event handlers final functions can be called different for each sender if it is necessary). So, create a block of code on the unit level protected with the directive (*$ifdef al4code*), and place there handlers of the AL-IV form, redirecting handling of events onto correspondent procedures already written in Pascal. E.g.: |
|
|
|
|
|
If a drawing is used on a canvas, then it is necessary to take into account that in the Delphi, the pixel is used as a unit, but it the AL-IV the point is used by default (but it is possible to switch using other units and pixels too among them). While calling a draw procedure for a TPaintbox, units of a Canvas are switched automatically to pixels, but in case of drawing on a bitmap canvas, you should do it by yourself. The same is for mouse events: Delphi procedures want working with pixels whereas the AL-IV stores mouse coordinates in points and not from the sender control corner but relative to the form client area top-left corner. Still working with the mouse is not so wide-spread, convert coordinates by yourself in such events calling correspondent functions from the Delphi2AL4.pas unit. |
|
Manual Pascal to AL-IV code conversion: global variables |
|
There are no glbal variables in the AL-IV programming language, and the var statement on a unit level is not allowed in the code converter. To work same way in both versions of the code (in the previous Delphi project - a bit modified, and in its AL-IV-compliant mirror), it is necessary to move all such variables to the main form (making these its fields). Suppose the main form is named as fmMain. In such case in the Delphi project migrating all the references onto global variables should be rewritten as fmMain.SomeVar. Particularly in case of a child form named fmChild1, we will refer to it as fmMain.fmChild1, obviously. To allow in context of methods all the forms to recognize the identifier "fmMain" as the reference onto the main form and not to go on the long way (* - see below), it is better to do following: to define in the main form a function which name matches the main form name (in our example: fmMain). This must be the FUNCTON, not the METHOD (I think you should understand why). To avoid creating native classes for each possible target framework/compiler its own version which extract the reference onto the main form, just write in the body of the function created following code: In case of the AL-IV code: In case of the Pascal code: |
|
(*) The long way could be in: - creating a local variable named e.g. fmMain_ in each form; - writing a function fmMain in each form returning value of such variable; - and adding in all the points where such child forms objects are created additional assignments of the reference onto the main form to that local variables fmMain_. Ant this way is not only long but it can lead to errors if you forget e.g. make such assignments in some cases. |
Content |
PART 1. AL-IV: How to start programming
PART 2. AL-IV: Creating GUI applications
PART 3. Development environment: source editor IDE AL4
APPENDIX 1. AL-IV: Command files magician running a compiler
APPENDIX 2. AL-IV: Gradual switching to AL-IV in an existing project
|